CI/CD Pipeline Design: Build-Deploy-Test
The Build-Deploy-Test process, and the core structure of the pipelines.

The first part of the series defined the objectives of the pipelines, and defined the stages that go with them. In this second part, I will focus on the core Build-Deploy-Test loop, which forms the core of each pipeline, and the design objectives and design decisions we made. If you have not read Part 1, I would recommend that you do so first, since this part will assume some context that is provided in the previous article.
As explained in the previous article, essentially all of the pipelines perform 3 key steps:
- They build a particular version of the source code into a set of artifacts that can be used to deploy the software.
- They deploy these artifacts to an environment and initialize the environment so that it can be used as the system under test.
- They run a set of checks and tests on the environment to assess the health of the software, and communicate the results to the team.
These three key steps form the core of the pipelines, and encapsulate the bulk of the complexity in our CI/CD system. The detailed design choices would be easier to understand if we first describe some additional objectives, that dictated to a large degree the nature of the implementations:
- The implementation should be in scripts and/or code that are human readable, and can be kept under version control. Practically nothing of significance was to be implemented through the UI of the CI/CD infrastructure. This way we could overcome the decay in knowledge about our pipelines. In particular, everyone could (and should) learn how the pipelines work just by reading these scripts. On-boarding new team members on how the pipelines work became much easier. We could make sure that we could deploy new pipelines quickly and accurately, just by inserting these scripts into the CI/CD infrastructure, and we could make sure that all of our pipelines were running the same version of the process, instead of having older pipelines running older versions. We could update all our pipelines at one single point, and there would be a single source of truth for what the pipelines did.
- All stages should run exactly the same scripts, including Local. This way we could eliminate the constant struggle to understand why something worked in the Commit stage, but failed on RC, or (much more frequently) issues were caught in Commit, Nightly, or RC, that should have been caught in Local. In particular, it removed the incentive to work around the pipelines and, in doing so, defeating their primary purpose, which was to ensure that the software remained in good health at all times.
- The pipelines, and the process of using them, should be so easy that everyone could use them (as opposed to just the developers), and there was no incentive not to. This allowed us to break away from some very fragile processes, where only specific people in specific teams knew how to execute certain steps, meaning that if any of the key people were missing we would often have to skip releases.
- Each of the scripts for Build, Deploy, and Test, should be executable on its own (independent from the others) and should be executable from the CLI. This requirement served two distinct purposes. First, it made sure that the scripts can be used on Local, where no CI/CD infrastructure was present. Second, it enabled some stages to skip steps that were unnecessary; for example, there was no point in a Build step for PLS and SEC since these stages use exactly the same version as RC.
High Level Architecture
The fundamental design principle is that each of the stages would be composed of the same building blocks, but configured by a small set of parameters. The implementation of the Build, Deploy, and Test scripts defines these building blocks, which are common to all stages. As explained in Part 1, the stages are effectively characterized by three key attributes:
- How/when the stage is triggered
- Which version of the software it builds and tests
- Which tests and checks it runs
A natural place to define the stage trigger was in the CI/CD infrastructure itself. This was one of the few exceptions we made to our rule of not defining anything of significance through the UI of the CI/CD infrastructure (albeit a very small exception).
We decided to define the version of the software by using tags in our source code repository. In this way, we could hide some of the complexity of dealing with different components that need to match versions. The easiest example to think about is the automated UI tests, which should match the version of the corresponding code implementing the behavior. Rather than worrying about providing an external mechanism by which to match the versions of such components, we could simply mark (or tag) a particular state of the source code repository. Assuming that the versions of both components matched when the tag was created, then we were guaranteed to get matching versions by pulling the version that corresponds to the tag.
The tests and checks were the easiest to define. The majority of the code checks are local in nature, meaning they only need to be run on the code files that have changed (e.g., a style checker). The same generally applies to unit tests (at least in the case of well-designed units and unit tests). These checks and tests are run during the Build step (more on this in the corresponding section) and are run for every stage. Some checks are global in nature (meaning that changing one file may require scanning a lot of other files, as well as the one that has changed). These are also run during the Build stage, but only on the appropriate stages. Finally, the API tests and UI tests are grouped into suites, and the suite name can be passed into the Test step to define which tests are run.
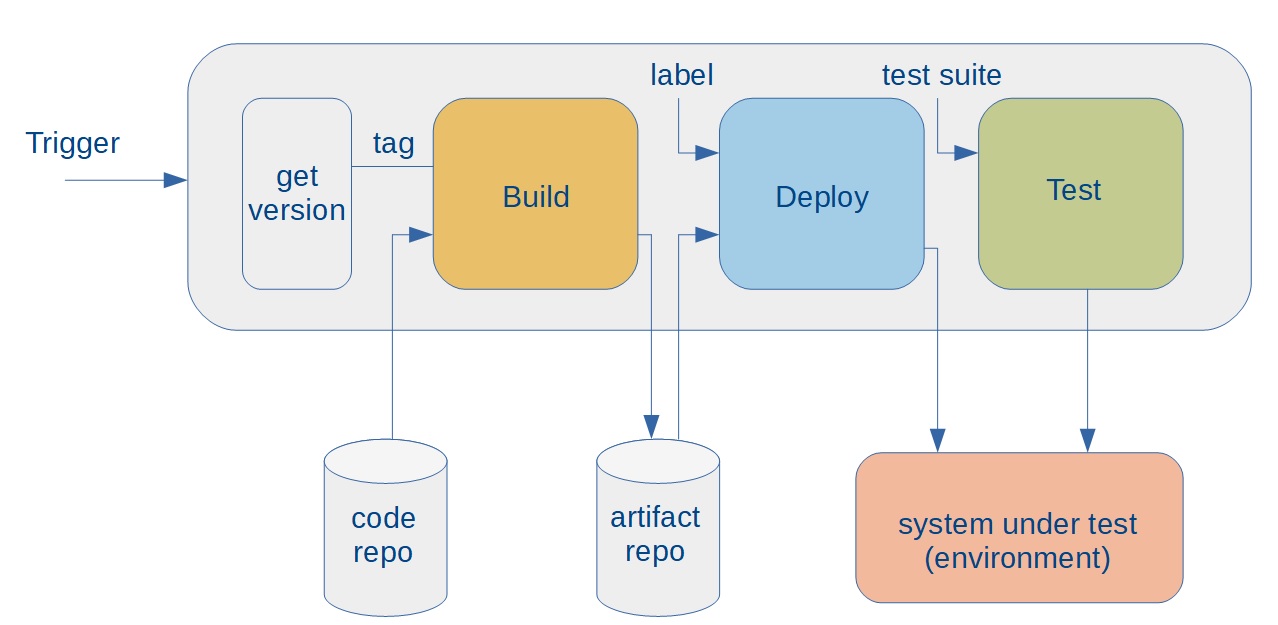
The general pipeline structure
The figure above shows the general architecture of the pipelines for the various stages. The pipeline is initiated by an external trigger. For the Commit stage for example, this would be an event from the source code repository, generated every time a code commit is executed. For the RC stage, it would be a manual invocation of the pipeline. The first step is to then determine the source code repository tag that corresponds to the right version of the code (more details in the last section of this article). The pipeline passes the corresponding tag to the Build script, which then gets the right version of the source code from the code repository, and builds all the artifacts. The Build script then stores these artifacts in an artifact repository, and marks them with a label so that the later parts of the process know which artifacts to deploy. The pipeline then calls the Deploy script, passing in this label as a parameter. The Deploy script obtains the artifacts from the artifact repository, locates or creates the right environment, and deploys the artifacts to the environment. This environment will form the system under test. Finally, the pipeline calls the Test script, passing in the location of the environment, as well as the test suite to be run, as parameters. The Test script executes the tests against the environment, records the results, and communicates the outcome to the team.
All the stages described Part 1 can be implemented as variations of this general pipeline. As noted before, the main variations are the trigger, the version of the software, and the test to be run. The pipeline itself is little more than a wrapper that executes the Build, Deploy, and Test scripts, and passes in the right parameters. For example, for RC, the pipeline would receive the tag from the same UI that the user invoked (by providing a field in which the user enters the tag). It would then simply call the Build script passing in this tag. The label is generated as a derivative of the tag (in theory it could be the same). The pipeline then calls the Deploy script with the label and an environment as parameters, and once the Deploy script is finished, it calls the Test script passing in the test suite name for full regression (both on UI as well as API tests). The Nightly pipeline is essentially identical, except the trigger is a timer in the CI/CD infrastructure, and the tag is created to correspond to the HEAD of the branch in the code repository at the time. In effect, each of the stages can be trivially composed from this short number of steps, with all the complexity being handled in the Build, Deploy, and Test scripts. Keep in mind that the scripts are human readable and under version control, satisfying the objectives laid out at the beginning.
It is also worth noting that the artifact repository forms a very narrow interface between the Build step and the Deploy step, reducing coupling to a bare minimum. As long as the Build script makes sure that all necessary artifacts are present in the repository and labeled with the right label, it does not need to worry about how or where the Deploy script deploys them. Similarly, as long as a label contains a copy of each artifact (in the right version) needed to spin up an environment, the Deploy script does not need to know how they got built or labeled. The only invariant that needs to be maintained is that each label contains a single copy of each artifact needed, with the right version.
The following sections give some additional details on each of the major components of the system.
The Build Script
The Build script takes in a tag and a label, clones the version of the code corresponding to the tag, builds the various artifacts, and inserts them into the artifact repository under the corresponding label. It can, itself, invoke module-specific helper scripts if necessary. Our system consists of a legacy monolith written in a scripting language, coupled to a significant number of microservices written in Java. The code for the monolith is packaged into RPMs by hand-crafted scripts, whereas each Java micro-service is built using maven. The Build script calls all of these individual helper scripts and associated commands to build each module into the corresponding artifacts. Adding a module to the system involves adding one or more helper scripts, and calling them from the Build script.
Note that in a normal CI/CD infrastructure, multiple instances of the pipelines could be running at any given point in time. This means that multiple instances of the Build script could be running at the same time. Therefore, the Build script needs to perform all its work in a workspace local to each instance, otherwise the multiple instances may conflict with each other. In particular, the Build script will clone the source code from the code repository to a workspace with a unique name, and perform all the work of transforming the source code into artifacts in that working directory.
Also, in Local, the Build script needs to make sure that it does not clone the source code from the repository, as this would overwrite the code the developer is working on (and actually wants to build). There is a special tag, which when passed in, instructs the Build script to not clone the code from the repository, but instead use the code that resides on the workspace of the machine.
Finally, as mentioned earlier, most of the code checks (style checker, Sonar lint-like checking, etc.), plus the unit tests, are performed as part of the build processes. In particular, any check or test whose results are valid when only run on a single source code file, are run in the Build script (and can be thought of as compiler checks). The main reason we opted to do this, is that most build helpers are designed to only “build” the files that have changed, then assemble the intermediate results into complete artifacts. This started as an optimization back in the days of C/C++ and Makefiles, but became best practice. Since the checks (and properly written unit tests) in our case an be viewed as compiler checks, they can take advantage of this optimization if implemented as part of the Build script. Note that, as is the case with the results of the tests performed as part of the Test script, the outcomes of these checks and tests needs to be recorded and stored for future reference, as well as communicated to the team. For example, our Sonar scans upload all their results to the central Sonar repository.
The Deploy Script
The Deploy script takes in a label (and possibly an environment location), if necessary creates the
environment, and deploys and initializes the software. The Deploy script essentially abstracts the
process of creating a fully initialized instance of the software, from the process of building source
code into artifacts. Like the Build script, it can itself call helper scripts for each module. Our
monolith, for example, is first installed through RPMs, then configured and initialized through a series
of hand-crafted scripts. The associated micro-services are installed (currently also using RPMs) and
initialized through the standard systemd mechanism. Adding a module to the system involves
adding the corresponding deploy and initialization statements to the Deploy script. These may be encapsulated
in a helper script, which is then invoked from the Deploy script. Note that the Deploy script also needs to
deploy appropriate configuration files for the test environments.
Independent of the pipeline redesign, we had earlier opted to move all of our CI/CD pipeline infrastructure, plus all of our test environments, into AWS, mainly to simplify expanding this ecosystem as needed. In order to optimize the cost of the AWS services, the test environments are shut down when not needed. The Deploy script will spin the right environment up when invoked, and deploy the software to it. The Test script then spins the environment down once it is finished testing. At the same time, we wanted to maintain the ability to go back and review any test run, including being able to review the state of the system. To achieve this, the Test script saves a snapshot of the environment VM when it spins the environment down.
Putting the two together, the Deploy script spins up a base VM that contains the OS, but not the software to be tested. It then proceeds to deploy every necessary artifact in the correct version, plus the corresponding configuration files. In particular, it does not update an existing deployment with just the modules that have changed. Essentially it uses the Immutable Server pattern. This makes deployments much more reproducible, and reduces deviation between environments. The use of Immutable Server was one of the key actions we took to reduce the tendency for bugs to show in some environments while not showing in others. It also gave us the ability to arbitrarily recreate a particular environment to debug particular test failures. At any time in the future (as long as the artifacts are still in the artifact repository), a team member could invoke Deploy with the right label and environment and get back an environment just like the one that was used in the original test run. Given that the Deploy script is under version control, this process works even if the Deploy script has been modified since the time of the original run; an engineer can simply temporarily restore the older version of the Deploy script and create an environment using that version, instead of the latest.
The Test Script
The Test script takes an environment and a test suite as parameters, runs the corresponding tests against the corresponding environment, records the results, and communicates them to the team. It is primarily used to run API and UI (Selenium) tests. Note that the version of the tests is expected to match the version of the code, in order for the tests to pass reliably. This means that the tests themselves are considered an artifact in this case, and are obtained using the same label that is used to obtain the artifacts that make up the application.
The Test script is by far the simplest, yet it is not without some complexity. To begin with, it needs to deploy and manage a number of infrastructure modules used by the actual tests. For example, in our case it uses docker to deploy a Selenium Grid cluster. It also deploys components of the common framework we have implemented on top of Selenium, which is used by all of our tests. In addition, it must ensure that all the results are recorded and stored for future reference. The API tests and UI tests generate reports which are persisted under the build number. However, we opted to extract the application logs from the system under test and persist them as well, since for most reasonable cases of test failures, the first action of an engineer would be to inspect the application logs. If more detail is necessary, an engineer would have to revive the VM snapshot corresponding to the test run, and obtain the data manually.
As already noted before, once the Test script has finished running the tests (and has persisted the reports and logs), it spins down the environment to reduce the AWS costs.
Some final pipeline details
With the Build, Deploy, and Test scripts in hand, we can now start building the pipelines. As mentioned before, the triggers are implemented by configuring the corresponding part in our CI/CD infrastructure. Then the Build, Deploy, and Test scripts are invoked form the pipeline shell (written in Groovy in our case), passing in the right parameters at each step. The only missing part is determining the tag that corresponds to the code to be built. For RC, this is created externally (for now), and passed in using the pipeline UI. This allows the Product Owner a lot of freedom to determine what goes in the release. For Nightly, a tag is created automatically, corresponding to the HEAD of the branch at the time the pipeline was invoked. For Commit, we effectively use the UUID of the commit that caused the pipeline to be invoked (or at least we try to; it turns out that this is not contained in the event produced by our source code repository).
The Local stage diverges a bit more, but not by much. Since the CI/CD infrastructure is not available on the developer laptops, the pipeline, trivial as it may be, had to be implemented in a different mechanism. In the end we chose to implement it as a wrapper script around the Build, Deploy, and Test scripts. Nonetheless, since the process is primarily encoded in the Build, Deploy, and Test scripts, this is sufficient to meet our requirement that the same process is used. In the case of Local, the trigger is manual; which translates to the developer invoking wrapper manually. Determining the version of the software to build is trivial, since Local always uses the special tag, which denotes that the source code should be used as is in the developer's workspace, instead of cloning from the repository.
We chose to implement the Build, Deploy, and Test scripts using shell scripting for the following reasons:
- Shell is available on all machines which would need to perform builds (including Local).
- It is as human-readable as any other language and can be held in version control.
- It has enough flexibility to allow us to easily create all functionality we need
- It is mature, with clear documentation, and a large base of people who know how to use it.
In the next part we will describe how all the stages we described in Part 1 are put together, using the components we described here. We will also cover some optimizations and future refinements, as well as look into Continuous Deployment.